The post tdocker: A Terminal UI for Everyday Docker Commands appeared first on { 4Comprehension }.
]]>Daily Docker loop involves a bunch of operations used over and over again, and everything usually starts with docker ps.
You scan the output, find the container you are interested in, copy its ID, and then use one of most popular commands:
- docker logs -f abc123
- docker exec -it abc123 sh
- docker start/stop/restart abc123
- and so on….
Rinse, repeat, dozens of times a day.
I tried the most popular existing solutions, but they turned out overwhelming and clunky – overpacked with stuff that I did not need, so I ended up falling back to my scripts collection. Eventually, I got tired of the copy-paste loop.and eventually wrote a simple wrapper on top of Docker CLI.
Someone eventually suggested I should finish it up and release, and that’s how tdocker was born – a terminal UI that puts a navigable container list on screen and lets you do the most common Docker operations with a single keypress:
If you want to try right away, go for:brew install pivovarit/tap/tdocker
Source code can be found on GitHub.
What It Is (and What It Isn’t)
tdocker is not a Docker dashboard. It’s not a full management suite. It doesn’t create containers, manage images, or configure networks.
It’s supposed to give you convenient access to everyday operations you’d normally do right after looking up container id from docker ps:
- tail logs
- exec into a shell
- inspect a container
- start/stop/restart
- copy the container ID to clipboard
- show live stats (CPU, memory, network I/O)
- stream Docker events in real time
That’s the philosophy: if an operation isn’t something you’d do multiple times a week, it doesn’t belong here. No plugin system, no YAML configs, no container creation wizards.
Everything provided in a clean, readable and aesthetic terminal UI.
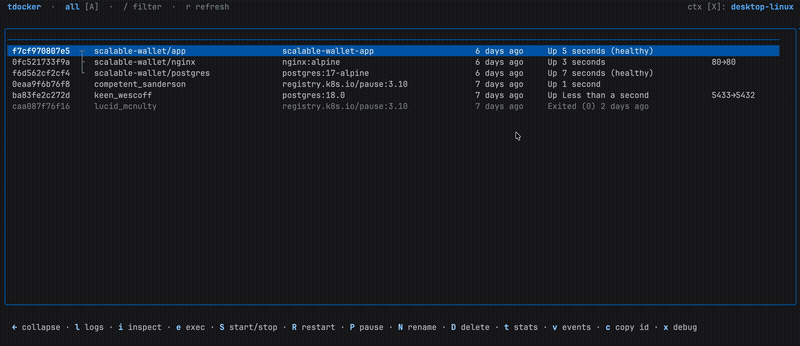
The Container List
The main view is a responsive table that adapts column widths proportionally to your terminal size. It shows the same information you’d get from docker ps, but navigable with arrow keys (or j/k if that’s your thing).
Press / to filter. The filter matches against container name, image, ID, and Compose project/service, basically everything you’d grep for.
If you work with Docker Compose, containers from the same project are visually grouped together:
Press ← on any member to collapse the entire group into a single summary row. Press → to expand it back.
Basic lifecycle actions work on the whole group when a collapsed row is selected – one keypress to stop or restart an entire Compose stack.
What’s more, if you keep expanding right, you’ll be able to view port bindings and network information as navigable sub-rows directly in the table.
Press c on a detail row to copy its value.
Container Logs
Press l to open a log viewer that auto-scrolls as new lines arrive. Scroll up to pause the auto-scroll; scroll back to the bottom to resume.
Press / inside the log viewer to search – the search can run either client-side or server-side (Ctrl+G toggles between the two when docker logs --grep is available).
Exec and Docker Debug
Press e to exec into a container. tdocker auto-detects which shell is available – bash, sh, or whatever the container has.
For distroless or scratch-based images where no shell exists, press x instead to launch a docker debug session.
Context Switching
Press X to open a context picker overlay – useful when you switch between local Docker Desktop and a remote daemon.
Under the Hood
tdocker is written in Go using Bubble Tea v2 – the Elm-architecture TUI framework from Charm. The entire UI is a single Bubble Tea program with the table component from Bubbles and styling from Lip Gloss.
There’s no Docker SDK dependency for the core operations. Container data comes from parsing docker ps --format '{{json .}}'. This keeps the binary tiny and avoids coupling to a specific Docker API version.
Clipboard support works across macOS, Linux/X11, Wayland, and even SSH sessions via OSC 52 escape sequences.
Getting Started
Install with Homebrew:
brew install pivovarit/tap/tdockerOr with go install:
go install github.com/pivovarit/tdocker@latestThen just run tdocker. Press ? for a full keybinding reference.
The source code is on GitHub. If it saves you a few hundred copy-pastes a week, it’s done its job.
The post tdocker: A Terminal UI for Everyday Docker Commands appeared first on { 4Comprehension }.
]]>